
Views: 0 Author: Site Editor Publish Time: 2026-07-03 Origin: Site


Hard floors, glass, smooth ceilings, and bare walls can make an attractive room sound uncomfortable. A carefully planned acoustic wall covering can soften reflected sound while introducing color, texture, and architectural character. Successful results depend on choosing the right treatment area, pattern, orientation, lighting, and installation details rather than simply filling an empty wall. These ten tips explain how to integrate acoustic wall covering into residential, workplace, hospitality, and shared interiors without allowing acoustic treatment to overwhelm the wider design.
Acoustic wall covering is primarily intended to manage sound reflections within a room. It should not be confused with structural soundproofing, which relies on sealed openings, insulated assemblies, added mass, and construction details that restrict sound transmission. Before selecting a panel, identify whether the main concern is excessive reverberation, unclear speech, distracting echoes, or external noise entering through the building. This distinction helps determine whether absorptive wall treatment is appropriate and prevents decorative panels from being expected to solve a different type of acoustic problem.
Observe the room while people are talking, music is playing, or equipment is operating. Large uninterrupted walls opposite speakers, televisions, desks, meeting tables, and seating areas often create stronger reflections than surfaces already softened by curtains, shelving, or upholstered furniture. Position acoustic wall covering on the exposed areas where reflected sound is most noticeable instead of distributing small panels randomly. Parallel hard walls also deserve attention because sound can repeatedly travel between them. In a home office, treatment behind or beside the workstation may help reduce distracting reflections during calls, while a media room may benefit from treatment near the main seating and listening areas.
A reading corner, video-call background, dining room, and home theater do not require the same amount of acoustic wall covering. Consider the room volume, ceiling height, number of hard surfaces, typical occupancy, and sound level before deciding how much of the wall to treat. A narrow strip may create visual interest but will influence the acoustic environment less than a broader installation. Begin with the activity zone that creates the greatest need. Rooms containing rugs, curtains, fabric seating, and other soft materials may require less additional treatment than minimal spaces dominated by glass, stone, concrete, or painted plaster.
Decorative acoustic panels are most effective visually when their layout responds to the surrounding architecture. Doors, windows, furniture, lighting, wall dimensions, and viewing angles should all influence the pattern. Decide where the composition begins, where it ends, and which feature should receive the greatest emphasis before installation starts. This preparation creates a deliberate acoustic wall covering rather than a collection of panels added one at a time. It also reduces awkward cuts, uneven rows, and patterns that drift away from the intended alignment.
Repeated geometry gives an interior rhythm and helps distinguish the treated area from surrounding finishes. Squares create an orderly grid, diamonds introduce movement, and elongated elements can direct attention toward furniture or an architectural feature. For example, Diamond Acoustic Tiles can form chevrons, diagonal bands, zigzags, or repeating blocks. Their modular shape also allows selected colors to be introduced without losing the overall geometry. Draw the pattern to scale and mark a central reference line before fixing the first tile so that each additional row remains aligned.
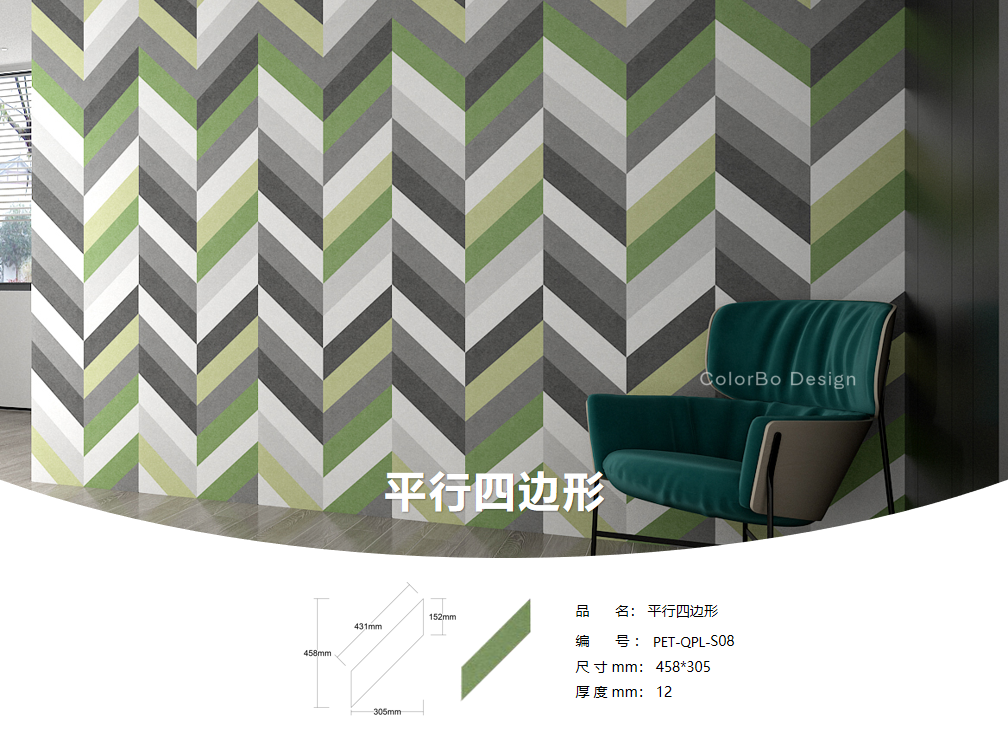
Panel orientation affects how people perceive the width and height of a room. Vertical lines can emphasize ceiling height, while horizontal arrangements may make a narrow wall appear wider. Diagonal patterns create movement and can guide attention toward artwork, a reception desk, a headboard, or a media display. Consider the acoustic wall covering from the main entrance and primary seating position before choosing its direction. A strong diagonal layout may work well on one focal wall but feel restless when repeated throughout a compact room. Changes in direction should occur at planned boundaries rather than wherever two panels happen to meet.
Texture alone does not make an acoustic installation feel integrated. Panel colors should relate to the flooring, furniture, textiles, and surrounding walls, while lighting should reveal the surface without producing glare or excessive shadow. Treat acoustic wall covering as part of the complete material palette instead of an accessory added after the room is finished. A coordinated palette can make extensive treatment feel calm and architectural, while a controlled contrast can turn a smaller installation into an intentional focal point.
A practical color scheme often combines one dominant tone, one supporting neutral, and a limited accent. Charcoal or deep grey can define a focal area in a bright room, while pale grey, beige, muted green, or off-white can preserve openness in a smaller interior. The acoustic wall covering does not need to match every furnishing, but it should connect with at least one color repeated elsewhere. For geometric layouts, use contrast to clarify the pattern rather than assigning a different color to every element. Test samples under daylight and evening lighting because the same panel may appear warmer, cooler, lighter, or darker as illumination changes.
Raised surfaces become more expressive when light travels across them from the side. Wall washers, concealed linear fixtures, and adjustable spotlights can create gentle shadows that reveal depth, while direct frontal lighting may flatten the relief. Excessively steep angles can create harsh shadows, so the light position should be tested before final installation. The 3D Polyester Wall Panels measure 500 × 500 mm and are 23 mm thick, giving their repeated surface enough depth to respond clearly to directional lighting. Plan cables, switches, and fixture positions early so they do not interrupt the finished acoustic wall covering.
Open-plan interiors often need visual separation without additional permanent walls. A change in texture can identify a work area, media zone, reading corner, dining space, or conversation area while preserving the original floor plan. Acoustic wall covering is especially useful where several activities share one room because it can establish a recognizable boundary and soften reflections close to the busiest zone. The treatment should align with furniture, lighting, or architectural features so that the boundary appears purposeful rather than arbitrary.
Install panels around an element that already organizes the room, such as a television, desk, headboard, dining bench, presentation screen, or reception counter. This gives the acoustic wall covering a clear visual role and prevents it from appearing as isolated decoration. The treated area can extend slightly beyond the furniture to create a balanced frame without occupying the entire wall. For a stronger linear effect, PET Stripe Wall Panels measure 2400 × 1200 mm and are 18 mm thick. Their cut-line surface can be placed vertically, horizontally, or in intersecting directions.

Partial treatment can work well when it surrounds a clearly defined activity area. A reading chair, compact recording desk, music practice corner, or collaborative table can be visually enclosed with panels on one principal wall and part of an adjacent wall. This arrangement concentrates acoustic wall covering near the people and sound sources that matter most while allowing the rest of the interior to retain its original character. Align the boundaries with furniture edges, shelving, ceiling details, or a consistent measured width. Rugs, curtains, upholstered seating, and fabric accessories can then support the wall treatment and create a more balanced acoustic environment.
Installation details influence the final appearance as strongly as color and pattern. Uneven starting lines, poorly planned cuts, damaged edges, and awkward transitions can make a carefully selected material look improvised. Review the wall condition, panel size, fixing method, corners, electrical services, and final edge treatment before work begins. A small layout drawing or physical mock-up can reveal problems that become difficult to correct after the full acoustic wall covering is installed.
Measure the entire wall rather than calculating only the open central area. Record door frames, skirting boards, switches, sockets, thermostats, vents, shelving brackets, and surface irregularities. Create an elevation showing the panel grid and every required cut so that narrow leftover pieces do not appear unexpectedly at one edge. Whenever possible, balance cut panels on opposite sides or begin the acoustic wall covering from a visible centerline. Decide whether exposed edges will finish with complete panels, precisely cut material, or a separate trim. The wall should also be clean, dry, stable, and suitable for the selected fixing method.
Shape and color may attract attention first, but practical selection should also consider dimensions, thickness, acoustic performance, fire rating, installation method, handling, and compatibility with the intended space. A modular tile can simplify detailed patterns, while a large-format panel may reduce the number of visible joints across a broad wall. The diamond panel measures 305 × 458 mm, is 9 mm thick, and has an A2 fire rating. The 3D panel measures 500 × 500 mm, is 23 mm thick, and has a B1 fire rating, while the striped panel measures 2400 × 1200 mm, is 18 mm thick, and also has a B1 fire rating. All three use polyester fiber with 50% recycled content and have an NRC range of 0.45–0.75. Confirm the exact model specification and project requirements before ordering.
Design Objective | Suitable Approach | Detail to Check |
|---|---|---|
Create a bold focal wall | Repeated diamonds or directional stripes | Centerlines and edge cuts |
Add subtle texture | Single-color three-dimensional relief | Side lighting and shadow depth |
Emphasize ceiling height | Vertical grooves or elongated layouts | Alignment with furniture and doors |
Define a work or media zone | Partial treatment around the activity | Reflection points and coverage area |
Simplify a large installation | Large-format panels | Handling, seams, outlets, and access |
A successful acoustic wall covering should respond to a genuine sound problem while supporting the proportions, colors, lighting, and function of the interior. Begin with the strongest reflection zones, choose a suitable coverage area, and test the pattern before installation. Shanghai ColorBo Industrial Development Co., Ltd. is an acoustic materials manufacturer and supplier offering modular, dimensional, and large-format PET panels. Its product range can support varied interior layouts when designers compare panel dimensions, acoustic performance, fire ratings, installation needs, and visual effects with the specific requirements of each project.
A: No. Acoustic wall covering mainly reduces reflected sound and reverberation inside a room, while soundproofing requires construction methods that restrict sound transmission between spaces.
A: Not always. Strategic coverage around reflection points, workstations, media areas, and conversation zones may be more practical than treating every available wall surface.
A: Consider the wall behind or beside the desk, especially surfaces that reflect the speaker’s voice toward the microphone or make speech sound less clear.
A: Yes, but use one dominant geometry and limit secondary patterns. Repeated colors, aligned edges, and consistent spacing help different shapes form a coherent composition.
A: Check wall condition, dimensions, fixing method, edge details, outlets, acoustic performance, fire rating, and compatibility with the intended room and project requirements.